

 ChatGPT
 Grok
Grok Claude
 Perplexity
 Google AI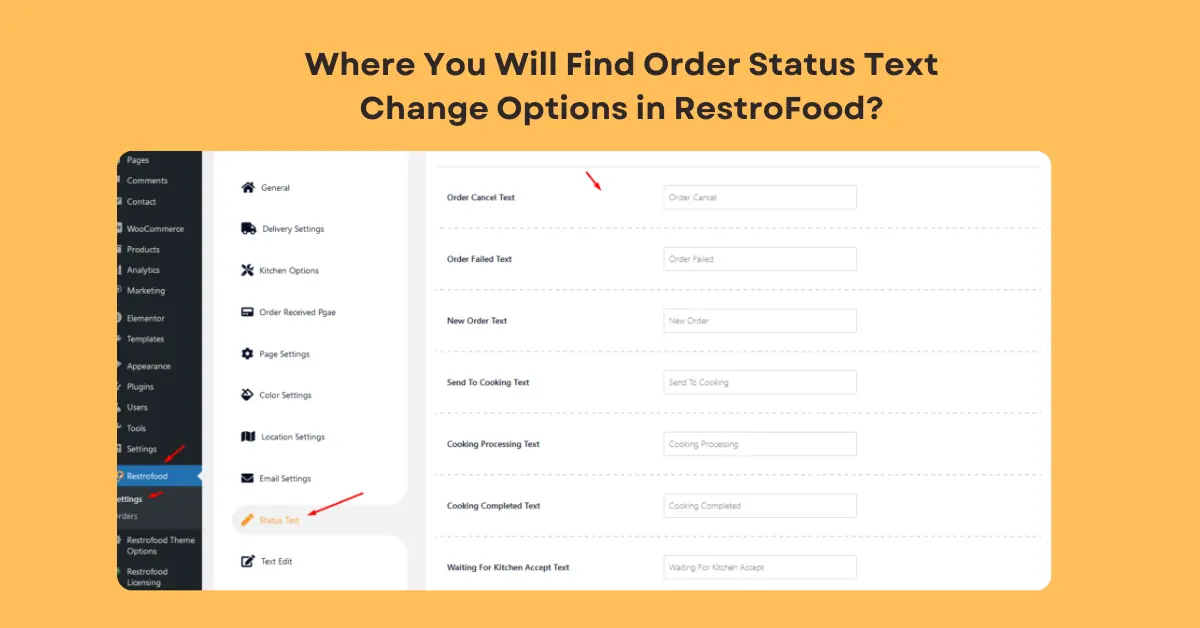
RestroFood lets you customize the wording shown for every stage of an order from the moment it’s placed to the moment it’s delivered or picked up. These labels appear across your admin panels, kitchen screens, and customer-facing order tracking, so you can rename them to match your restaurant’s tone or workflow. This guide shows you exactly where to find and edit them.
Navigation Path
- Log in to your WordPress Admin Dashboard.
- In the left-hand admin menu, click RestroFood.
- In the RestroFood settings sidebar that appears, click Status Text.
- The Status Text page opens on the right and lists every editable order status label.
WordPress Admin → RestroFood → Settings → Status Text
What the Status Text Page Is For
Each order in RestroFood moves through a series of statuses as it’s accepted, cooked, and delivered or picked up. The Status Text page lets you change the display text for each of these statuses the words your staff and customers actually see without touching any code.

Available Status Text Fields
| Field | Default Text |
| Accept Order Text | Accept Order |
| Order Cancel Text | Order Cancel |
| Order Failed Text | Order Failed |
| New Order Text | New Order |
| Send To Cooking Text | Send To Cooking |
| Cooking Processing Text | Cooking Processing |
| Cooking Completed Text | Cooking Completed |
| Waiting For Kitchen Accept Text | Waiting For Kitchen Acceptance |
| On The Way Text | On The Way |
| Ready for Delivery Text | Ready for Delivery |
| Ready To Pickup Text | Ready To Pickup |
| Delivery Completed Text | Delivery Completed |
| Order Placed Text | Order Placed |
| Accepted Cooking Text | Accepted Cooking |
| Processing Text | Processing |
| On The Way To Delivery Text | On The Way To Delivery |
Note: The “Accepte Order Text” field label reflects a minor typo in the current plugin UI (it functions as the Accept Order text). It’s listed here exactly as it appears on the settings screen so you can locate it easily.
Saving Your Changes
- Type your custom wording into any field(s) you want to change.
- Click the orange Save Setting button available both at the top-right and bottom of the page.
- Your updated labels take effect immediately across the admin panel, kitchen dashboard, and any customer-facing status displays.
Related Settings Nearby
While you’re in the RestroFood settings menu, these related pages sit right next to Status Text and are worth knowing about:
- Text Edit – for editing other plugin-wide text strings beyond order statuses.
- Email Settings – for customizing the email templates sent alongside status changes.
- Order Received Page – for controlling what customers see immediately after placing an order.
Conclusion
The Status Text page in RestroFood gives you full control over the language your customers and staff see at every stage of an order without touching a single line of code. By navigating to RestroFood → Settings → Status Text, you can rename any of the 16 status labels, from “Order Placed” through “Delivery Completed,” to match your restaurant’s own tone, branding, or workflow terminology.
Once you’ve made your edits, remember to click Save Settings to apply the changes; they’ll immediately reflect across your admin panel, kitchen dashboard, and any customer-facing order tracking. Since these labels touch nearly every part of the order lifecycle, it’s worth reviewing them once after setup and revisiting anytime your team’s process changes, so your status messaging always stays clear and consistent for both staff and customers.
Tip: A blue “?” help icon in the top-right of the Status Text page links to further guidance if you need it while editing.